4. Publishing SharePoint Through a Portal Trunk in UAG
After you have set up
the portal trunk in the UAG, you can publish various applications
through this portal trunk. The following sections explore how to publish
SharePoint sites using a portal trunk and then enable access to mobile
and handheld devices.
4.1. Adding a SharePoint Site as an Application to a Portal Trunk
To add a SharePoint site as an application to the portal trunk, complete the following steps.
Launch the Unified Access Gateway.
Expand the HTTP Connections node.
Select the portal trunk you created earlier.
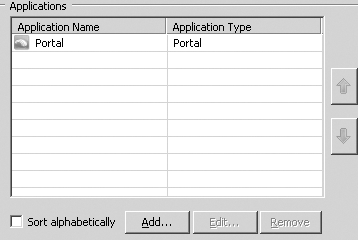
In the Applications section shown in Figure 5, click Add to publish a SharePoint site in UAG using the Add Application Wizard.
Click Next on the Welcome page of the Add Application Wizard.
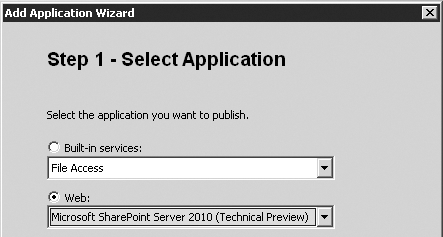
On the Step 1 – Selection Application page shown in Figure 6, select the Web option, select the Microsoft SharePoint 2010 application template from the drop-down list, and then click Next.
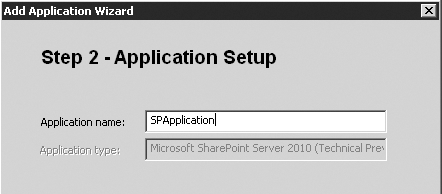
On the Step 2 – Application Setup page shown in Figure 7, provide a name for your SharePoint application by typing a value in the Application Name text box and clicking Next.
On the Step 3 – Endpoint Security page, select the following values and then click Next.
For Access Policy, select Default Web Application Access.
For Upload Policy, select Microsoft SharePoint 14 Upload.
For Download Policy, select Microsoft SharePoint 14 Download.
For Restricted Zone Policy, select Default Web Application Restricted Zone Access.
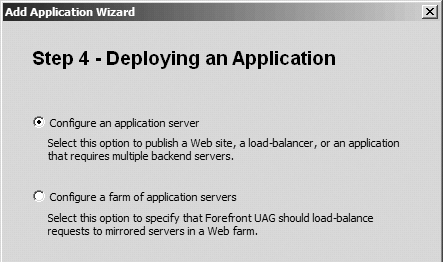
On the Step 4 – Deploying An Application page shown in Figure 8, select one of the following and then click Next.
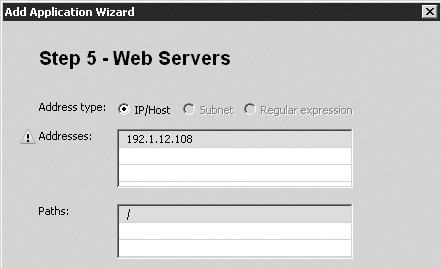
On the Step 5 – Web Servers page shown in Figure 9, capture the following details.
Select the IP/Host option.
In
the Addresses section, double-click the list and then enter the IP
address associated with the public host name of SharePoint Web
application to be published.
In
the Paths section, add additional site collections that you would like
to publish apart from the root site collection (/) by double-clicking
the list and adding the paths.
Select
the HTTP port option and specify the port used by your Web application.
In case of an SSL-enabled Web application, use the HTTPS port option
and specify the port.
Specify the Public Host Name assigned in Internet zone AAM of the Web application.
On the Step 6 – Authentication page, perform the following actions.
Select the Use Single Sign-On To
Send Credentials To Published Applications check box for the portal
trunk to send the user’s logon credentials to the SharePoint site.
In
the Select Authentication Servers section, select the authentication
server for the SharePoint Web application by clicking Add, and then in
the Authentication and Authorization dialog box, select the server and
click Select.
Select the Both option for the portal trunk to use both 401 request and the HTML form mechanism to submit the logon credentials.
On the Step 7 – Portal Link page, specify the following details.
Select Add A Portal And Toolbar Link to include the SharePoint site as a link in the UAG portal website.
Type the Portal Name for the SharePoint site.
Optionally, enter the Folder in which the SharePoint portal link should be displayed.
Enter the Application URL for the SharePoint site.
Enter the Mobile URL for the SharePoint site. This URL will be used by mobile devices to access the SharePoint site.
Enter the Icon URL to be shown along with the SharePoint site link.
Optionally, enter a Short Description for the SharePoint site.
Optionally, enter a Description for the SharePoint site.
Select the Open In A New Window check box to have the SharePoint site launch into its own window when user clicks the link.
On
the Step 8 – Authorization page, select the Authorize All Users check
box to allow all authenticated users to access the site.
On the Completing The Add Application Wizard page, click Finish to create the SharePoint site link in the portal trunk.
4.2. Enabling Mobile Access for a SharePoint Link in a Portal Trunk
To enable the application portal to work on handheld devices and mobile browsers, perform the following configurations.
Launch the Unified Access Gateway.
Expand the HTTP Connections node.
Select the portal trunk you created earlier.
In the Applications section, select the application you created for SharePoint and click Edit.
In the Application Properties dialog box, navigate to the Portal Link tab.
In the Application Supported On section, select the Handheld Device and Mobile Internet Browser check boxes.
Click OK to complete the configuration.